
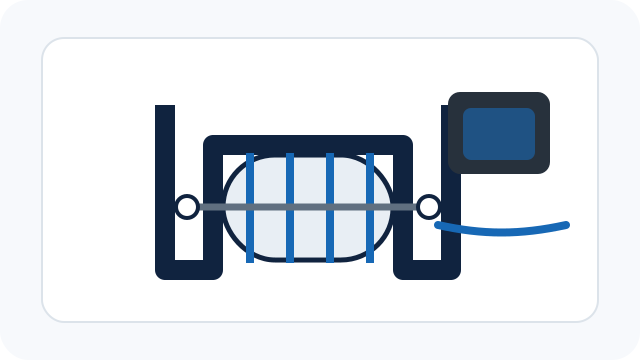
The roller makes more sense as a small system than as a cylinder by itself. The idea is simple: lightly ink the raised rings on a stamp-style ink pad, then roll the tool over the sheet to transfer the guide lines. The cylinder already existed; the missing part was everything needed to hold and roll it.
Context
The current roller has circumferential raised ribs for the four guide positions. My intended use is not embossing: I want to pass the roller over an ink pad, pick up a small amount of ink on those ribs, and then roll it over paper. That means the roller needs to rotate freely and the user needs a handle that does not touch the inked surface.
The parts
The 3D Templates page now includes three accessory SCAD files: a U-shaped yoke/handle, a simple printable test axle and a pair of spacers. The yoke is generated from the current roller width and axle diameter. The spacers keep the cylinder away from the handle arms. The printable axle is useful for prototyping, but with the default 6 mm axle I would start with an M6 bolt because it is straight, strong and easy to replace.
How I intend to assemble it
The roller sits between the two arms of the yoke. A washer or printed spacer goes on each side, then the axle passes through one arm, the first spacer, the roller, the second spacer and the other arm. The roller should turn without binding but should not have enough side play to wander across the page.
How I intend to ink it
Use a stamp-style ink pad and very light pressure. Only the raised ribs should receive ink. Test first on scrap paper: too much ink or pressure will make the lines wider and can create blobs at the start of the roll. A straight, continuous motion should be easier to control than repeatedly stopping and starting.
What is not validated yet
This complete roller assembly is still a prototype. I have not yet validated the handle geometry, axle fit, spacer thickness or the amount and type of ink required for a clean line. The printed parts therefore carry revisions. Once there is a physical test, the next revision should reflect what actually worked rather than what only looked correct in CAD.